Hardware Information
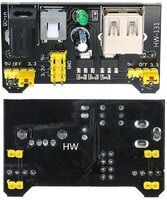
Bread Board Power Adapter 3.3V / 5V - Power-Modul für Breadboards.
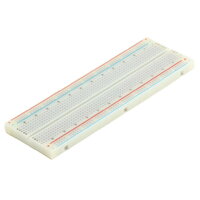
Passend für alle Standard-Breadboards (MB-102, ZY-60) Add a comment
Read more: 3.3V / 5V Power Adapter für BreadBoards mit Micro USB
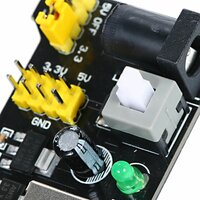
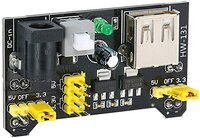
Das HW131 ist ein 3,3 V/5 V MB102 Breadboard-Netzteilmodul, das über zwei 5-V- und 3,3-V-Stromschienen verfügt und eine Mehrzweck-USB-Buchse besitzt.
Das Netzteilmodul passt sicher in ein standardmäßiges 400 Pin oder 800 Pin-Breadboard. Es verfügt über einen Verpolungsschutz.
Das Modul kann einen Eingang von 6,5 bis 12 V aufnehmen und 3,3 V und + 5 V erzeugen.
Das Modul kann auch 5V am USB-Anschluss oder über den USB-Anschluss ausgeben.
Es ist ein Muss für Maker, die elektronische Schaltkreise auf dem Steckbrett testen.
Spezifikationen:
- Eingangsspannung: 6,5-12V (DC-Netzteil (nicht im Lieferumfang)) oder mit USB Stromversorgung
- Ausgangsspannung: 3,3V / 5V schaltbar
- Ausgangsstrom: <= 700 mA
- unabhängige Steuerung auf oberer und unterer Stromschiene, umschaltbar auf 0V, 3,3V, 5V
- Zwei Anschlüsse zu jeweils 3,3V und 5V DC Ausgangspins sind auf der Platine montiert, um ein einfaches externes Herausführen zu ermöglichen.
- Die weiße Taste ist der Hauptschalter des Power Moduls.
- Dimensionen: 53mm x 32mm x 25mm
- Gewicht: 12g
a b c d Add a comment
|
problem with WLAN connection # c |
1 ping -c4 10.18.23.1 > /dev/null 2 3 if [ $? != 0 ] 4 then 5 echo "No network connection, restarting wlan0" 6 /sbin/ifdown 'wlan0' 7 sleep 5 8 /sbin/ifup --force 'wlan0' 9 fi |
--> Link |
|
For the ersten boot
|
Code: /etc/wpa_supplicant/wpa_supplicant.conf
|
Raspberry Pi 4 (Debain10 | Buster) / Toolchain ESP32
Basic Goal: have a Raspberry Pi 4, with Desktop, Arduino iDE (v 1.8.9) Installed then in the Arduino IDE go to Tools - Boards --> Board Manager then Search for ESP32 you will find [esp32 by Espressif Systems] install it.
| docs.espressif.com | |||
| Setup Linux Toolchain from Scratch | |||
| Login as Pi | # sudo -i | ||
| Install Prerequisites | # apt install -y gcc git wget make libncurses-dev flex bison gperf python python-pip python-setuptools python-serial python-cryptography python-future python-pyparsing | ||
| Compile the Toolchain from Source | # apt install -y gawk gperf grep gettext libncurses-dev python python-dev automake bison flex texinfo help2man libtool libtool-bin | ||
| Create the working directory and go into it: | # mkdir -p ~/esp # cd ~/esp |
||
| gcc 8 will be installed but we need gcc 6 to compile | |||
| To check gcc version: | # gcc -v | ||
| To install gcc version 6: | # apt install -y g++-6 gcc-6 | ||
| To switch between gcc6 and gcc8: | # update-alternatives --install /usr/bin/gcc gcc /usr/bin/gcc-8 1 --slave /usr/bin/g++ g++ /usr/bin/g++-8 # update-alternatives --install /usr/bin/gcc gcc /usr/bin/gcc-6 2 --slave /usr/bin/g++ g++ /usr/bin/g++-6 # update-alternatives --config gcc |
||
| Download crosstool-NG and build it: | # git clone https://github.com/espressif/crosstool-NG.git # cd crosstool-NG |
||
| Important Bash 5 have to been accepted | # vi configure.ac | ||
| around line 193 add |5 | |$EGREP '^GNU bash, version (3\.[1-9]|4|5)') | ||
| save and Quit | |||
| # ./bootstrap && ./configure --enable-local && make install | |||
| then Quit sudo with | # exit | ||
| Build the toolchain: | # ./ct-ng xtensa-esp32-elf | ||
| # ./ct-ng build | |||
| chmod -R u+w builds/xtensa-esp32-elf | |||
| # cd /root | |||
| there should be a esp32 directory | # ls -alth | ||
| # cp esp32 -r --parents /home/pi/.arduino15/packages/ | |||
| github | espressif/arduino-esp32 | Installation instructions for Debian / Ubuntu OS | |||
| first know wehre your /Arduino/hardware is | # find / -xdev -name hardware | ||
| cd ~/Arduino/hardware mkdir -p espressif && \ cd espressif && \ git clone https://github.com/espressif/arduino-esp32.git esp32 && \ cd esp32 && \ git submodule update --init --recursive && \ cd tools && \ python3 get.py |
|||
| then copied the xtensa-esp32-elf directory (located in builds directory) over to /home/pi/Arduino/hardware/espressif/esp32/tools/ using copy and paste in the file browsers. |
|||
a
QUellen/Source:
- docs.espressif.com/projects/esp-idf/en/v3.2.2/get-started/linux-setup-scratch.html
- github | espressif/arduino-esp32 | Installation instructions for Debian / Ubuntu OS
-
-
- Add a comment
Bilder:
Documentation:
-
-
-
Quellen/Source:
- www.banggood.com
-
-
- Add a comment
Quellen/Source:
-
- Monitoring Temperature and Humidity Using InfluxDb and Grafana on Raspberry Pi
- Andreas Spiess | #255 Node-Red, InfluxDB, and Grafana Tutorial on a Raspberry Pi
-
-
-
-
-
- Add a comment
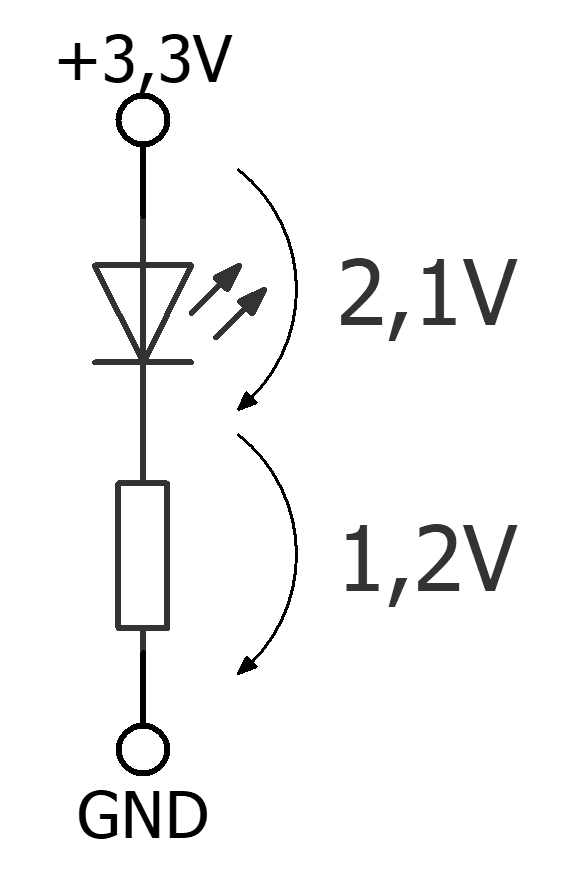
Also, was brauchen wir? Ein paar LEDs mit niedrigem Stromverbrauch und die passenden Widerstände dazu. Bei der Auswahl der LEDs sollte man folgendes beachten: Angeschlossen werden sie am GPIO-Header des Raspberry Pi’s. Aus den GPIO-Ausgängen kommt +3,3V heraus und an einem beliebigen GPIO wird der +-Pol der LEDs (das längere Bein) angeschlossen. Das kürzere Bein, der --Pol, wird über einen Widerstand an GND angeschlossen. Der Widerstand dient dazu, die überschüssige Spannung zu verbraten und den Strom durch die LED zu begrenzen.
Weiterhin müssen bei der Auswahl der LEDs deren technische Daten berücksichtigt werden. Die Versorgungsspannung sollte ≤3,3V und die Stromaufnahme ≤16mA sein, denn das ist der Strom, den die GPIO auf Dauer liefern können. Eine LED mit höherer Stromaufnahme wird zwar auch funktionieren, nur kann man sich nicht sicher sein, wie lange das funktioniert und ob der Raspberry Pi auf Dauer nicht doch Schaden nimmt.
Ich habe mich für Low-Current-LEDs entschieden, die eine Durchlassspannung von 2,1V und eine Stromaufnahme von 2mA haben. Das bedeutet, dass von den 3,3V, die der Ausgang ausgibt, 2,1V für die LED verwendet werden und die restlichen 1,2V über den Widerstand abfallen müssen. Weiterhin möchten die LEDs 2mA an Strom haben, sodass diese 2mA auch durch den Widerstand fließen müssen. die Größe des Widerstandes errechnet sich jetzt wie folgt:

Rein rechnerisch bräuchten wir einen 600Ω-Widerstand. Da es diesen jedoch nicht gibt, nehmen wir den nächst größeren mit 680Ω.
Quellen/Source:
- indibit.de
-
-
-
-
- Add a comment
Subcategories
Router Article Count: 19
Switch Article Count: 1
NAS / SAN Article Count: 4
Gadgets Article Count: 33
Gadget (englisch für Apparat, technische Spielerei oder auch Schnickschnack) bezeichnet ein technisches Werkzeug oder Gerät mit bisher so nicht bekannter Funktionalität und/oder besonderem Design. Es ist traditionellerweise klein und handlich und zum Mitführen konzipiert. Eine große Rolle spielt der Spaßfaktor eines Gadgets: Geräte, die sich als Gadget definieren, sind oft Grenzgänger zwischen sinnvoller Funktionalität und Verspieltheit.Der Duden definiert Gadget als „kleiner, raffinierter technischer Gegenstand“.
DCIM Article Count: 10
iot Article Count: 117
- Anker 575 USB-C Docking Station (13-in-1), 85W für Laptops
- Perfect Server Hardware for Virtualization | Proxmox | pve-05
- Pioneer Blu-Ray/BD/DVD/CD Reader/writer USB 3.0 BDR-XD07TB | WORKS OK with Debian 11
- NOT WORKING WITH DEBIAN 11 | Dockingstation | IcyBox 14-in-1 USB Type-C | IB-DK2262AC
- How to remove systemd services
- Laptop | Lenovo | Thinkpad E15 Gen3 AMD
- Laptop | Lenovo | LENOVO-IDEA IdeaPad 3 15IGL05 Notebook (15.6 ", 128 GB SSD, Business Black)
- D. Klimo | Kent monoblocks
- TTN Mapper
- LILYGO TTGO T-Beam V1.1 ESP32 LoRa 868Mhz GPS 18650 Board
- LILYGO® TTGO T-Beam 868MHz -> The Things Network (TTN/TTS) -> Karte | Infos und Video bei Alex (www.aeq-web.com)
- Kabelfarben 3.3V, 5V, 12V, 230V | Durchmesser
- 01 Digi-Bee Stand01 Wetter
- Solar Panel | 6V 3W Solar Panel JY D145x145
- TTGO LoRa32 V2.1_1.6 version 433/868/915Mhz ESP32 LoRa OLED 0.96 Inch SD Card Bluetooth WIFI wireless Module ESP-32 SMA
- -pve-04 | Disk SSD and HDD
- DISK SSD | 1 TB | Samsung SSD 870 EVO 1TB - 1TB
- NanoVNA V2
- CubeSat | antennas |
- KoZo_GS3_433MHz
- tinyGS - shortcut what it means
- TinyGS Telegram community | published Links
- Wolfgang W. Osterhage (Springer Verlag Sachbuch 2021): Die Geschichte der Raumfahrt | (gefundene Fehler)
- ucs Univention some commands
- SMA-Stecker / SMA-Buchse

 Auf Docker Hub liegen abertausende Container-Images – und mehr als 10.000 davon enthalten eigentlich geheime Zugangsdaten.
 Wackelige US-Datentransfers, kontroverse EuGH-Urteile, Datenomnibus, und vieles mehr. Im c't-Datenschutz-Podcast ziehen wir eine kritische Jahresbilanz.
 Sicherheitspatches schließen mehrere Schwachstellen in der Entwicklungsumgebung GitLab.
 In der Fernwartungssoftware Connectwise ScreenConnect können angemeldete Angreifer Schadcode einschleusen. Ein Update steht bereit.


